
Specifying Palladiana Terrazzo

For architects, specifiers, and project managers: access the official print-ready PDF specification work section by completing the download form at the bottom of this page.
1. GENERAL
1.1 Scope of Work
This worksection dictates the mandatory substrate evaluation, level-rectification, stone processing, and installation criteria necessary to execute a bespoke Palladiana terrazzo stone floor finish.
1.2 Substrate Performance Requirements
Reflective Crack Mitigation: Traditional, un-engineered site-mixed sand and cement screed beds are strictly excluded due to their high dry shrinkage ratios and curling potential. All floor level rectification and Finish Floor Level (FFL) management layers must utilise engineered, low-shrinkage formulations.
1.3 Concrete Moisture Testing & Substrate Acceptance
Mandatory Testing Protocol: Prior to the installation of any level-rectification underlayments or Palladiana topping matrices, the structural concrete subfloor must be tested for relative humidity (RH) compliance in strict accordance with AS 1884.
Testing Method: Moisture evaluation must be performed using in-situ relative humidity probes embedded into drilled core ports within the concrete slab. Electrical impedance meters or simple mat tests are not accepted as primary validation.
Acceptance Thresholds:
- Standard Pour: The concrete substrate must exhibit a maximum Relative Humidity (RH) reading not exceeding 75% prior to product application.
- Moisture Barrier Requirement: Where RH testing yields results exceeding 75%, the contractor must apply a heavy-duty, two-part epoxy moisture management barrier (e.g., Cemimax moisture vapour barrier or equivalent class system) over the shot-blasted concrete subfloor before level rectification begins.
2. PRODUCTS / MATERIALS
2.1 Primary Stone Slabs (Palladiana Elements)
Source Material: All Palladiana elements must be processed from select, sound natural stone slabs or large-format block offcuts.
Shaping & Processing Methods (Select One):
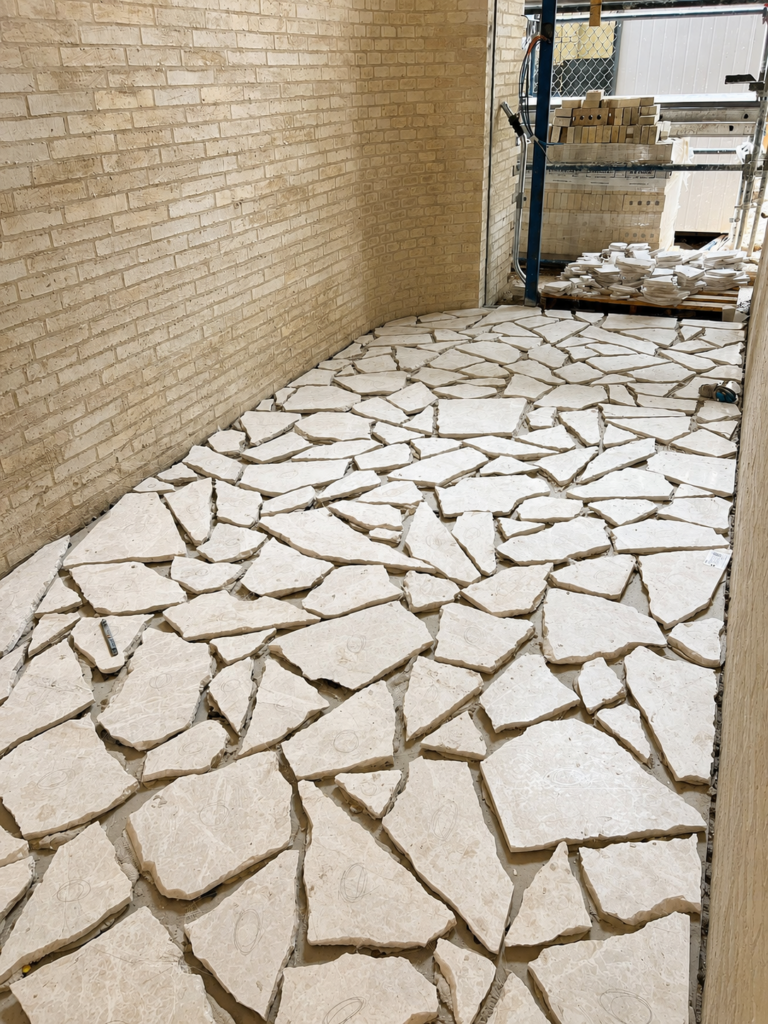
- Option 1 — Controlled Mechanical Fracture: Slabs are split using mechanical or hand-hydraulic tools to produce classic, irregular, non-uniform polygonal shapes with organic edge profiles.
- Option 2 — Linear Sawn / Geometric: Slabs are precisely cut using diamond saws into linear, rectilinear, or geometric fragments to achieve a structured, contemporary mosaic aesthetic.
- Option 3 — Hybrid Blend: A custom, curated combination of both fractured and sawn fragments processed to match the geometric distribution of the approved project control sample.
Sizing & Gradation Sorting (Select One):
- Size Profile A — Petite: Fragments ranging from 50mm to 120mm in the longest direction.
- Size Profile B — Standard: Fragments ranging from 100mm to 250mm in the longest direction.
- Size Profile C — Grand / Venetian: Large-scale fragments ranging from 200mm up to a maximum of 400mm in the longest direction.
2.2 Aggregate Infill Gradation & Topping Thickness Matrix
Dimensional Interdependency: To ensure complete structural encapsulation and prevent aggregate displacement or dislodgement during mechanical processing, the initial wet-pour topping thickness must be a minimum of 3mm to 5mm thicker than the maximum nominal aggregate size specified.
System Matrix & Buildup Profiles (Select One):
- Option A — Micro-Terrazzo Infill: Max aggregate size 0.5mm–3mm. Required wet-pour thickness 6mm–8mm. Target finished thickness 4mm–5mm.
- Option B — Standard Venetian Infill: Max aggregate size 9mm. Required wet-pour thickness 12mm–14mm. Target finished thickness 8mm–10mm.
- Option C — Oversized Venetian Infill: Max aggregate size 25mm. Required wet-pour thickness 28mm–30mm. Target finished thickness 22mm–25mm. Note: This option requires significantly greater material volume and on-site processing time. Your InStyle Stone representative will provide a detailed cost estimate.
2.3 Infill Binder Matrix (Select One)
- Option A — Traditional Cementitious Matrix: High-early-strength Portland cement modified with liquid acrylic polymers and synthetic, UV-stable iron-oxide mineral pigments.
- Option B — Thin-Set Epoxy Matrix: 100% solids, solvent-free, low-VOC epoxy resin
2.4 Metal Divider Strips (Select One)
- Option A — Solid Brass
- Option B — Zinc
- Option C — Stainless Steel Alloy 304
All profiles are L-shaped floor strip with a minimum top-edge thickness of 3mm.
Movement & Expansion Control: Where metal divider strips are not utilised over substrate control joints, structural movement must be managed via saw-cutting. The contractor must diamond saw-cut the cured matrix to mirror all underlying substrate expansion joints precisely. Void walls must be thoroughly cleaned, primed, and backfilled with a high-performance polyurethane flexible joint filler to accommodate structural thermal dynamics without causing edge-spalling.
Maximum Bay Dimensions: To mitigate shrinkage-induced tensile stress and prevent random reflective cracking, continuous cementitious field placements must be jointed or diamond saw-cut into isolated bays not exceeding 5m × 5m in total area. All topical cuts must align precisely with the building’s existing structural slab joints to ensure complete movement synchronisation.
3. EXECUTION
3.1 Substrate Preparation & FFL Management
Where the structural concrete base lacks the necessary flatness or elevation to accept the system directly, levels must be managed via one of the following methods:
- Engineered Hydraulic-Binder Screeds (20mm–60mm depth): Factory-blended, rapid-drying hydraulic binder (e.g., Mapei Topcem, Ardex A 38). Minimum compressive strength: 30MPa at 28 days.
- High-MOE Self-Levelling Underlayments (3mm–20mm depth): Heavy-duty, polymer-modified, fibre-reinforced cementitious self-levelling compound with a high Modulus of Elasticity (e.g., Mapei Ultraplan, Ardex K 15, Cemimax self-levelling systems). Minimum compressive strength: 35MPa at 28 days. Linear shrinkage: less than 0.05%.
3.2 Hand-Placement & Layout Density
Continuous Field Arrangement: Primary stone fragments must be distributed and laid out manually across the entire floor plane in a single, continuous, non-directional field. The irregular pattern must flow seamlessly and consistently to all terminating edges, wall junctions, and metal divider strips.
Layout Density (Select One):
- Option 1 — High-Density / Tightly Nested: Tightly arranged layout maximising stone face exposure with minimal matrix joints.
- Option 2 — Medium-Density / Standard: Balanced distribution with regular matrix gaps separating the stone fragments.
- Option 3 — Low-Density / Floating Stone: Widely spaced arrangement allowing the infill terrazzo matrix to act as a prominent design element.
Bedding: Firmly press and back-butter primary slabs into the binder matrix to eliminate air pockets, ensuring the wet-pour matrix floods upward between joints to a minimum depth of 3mm–5mm above the highest point of the stone.
3.3 Multi-Stage Mechanical Diamond Grinding Passes
- Pass 1 — Coarse Flattening: Shave down the 3mm–5mm wet-pour binder buffer using heavy-duty planetary grinding machinery and coarse metal-bond diamond segments (30–40 grit) to cleanly expose stone cross-sections.
- Pass 2 — Slurrying: Apply a matching epoxy or cementitious slurry filler over the entire vacuumed surface to plug all exposed pinholes or micro-voids.
- Pass 3 — Fine Honing: Remove tooling scratches using sequential grinding passes (80–120 grit metal-bond, followed by 50–200 grit resin-bond pads).
- Pass 4 — Polishing: Refine surface using resin-bond polishing segments up to 400 grit for a matte/honed finish, or sequentially to 1,500 grit for a high-gloss finish.
3.4 Slip Resistance Verification
An on-site Pendulum Slip Test must be conducted prior to sealer application to verify compliance with local commercial building codes.
Select Target Classification:
- P3 — Certified for internal residential paths and dry walkways (AS 4586)
- P4 — Certified for external commercial paving, ramps, and wet alfresco zones (AS 4586)
- P5 — Heavy-textured finish engineered for high-risk inclines
3.5 Penetrating Sealer & Protective Handover
Sealer: Apply a premium, vapour-permeable, non-sacrificial penetrating sealer that chemically bonds inside the stone pores without altering the certified slip rating.
Surface Protection: The contractor must fully cover the finished floor immediately following the curing process with a breathable, heavy-duty protective floor board (e.g., Ram Board). All seams between protective boards must be securely taped directly to each other using a dedicated vapour-permeable tape.
⚠️ Critical Handover Directive: Under no circumstances should adhesive tape, duct tape, or standard masking film be applied directly to the sealed Palladiana surface. This will trap moisture, disrupt the sealant profile, and cause permanent surface ghosting or staining.
Download the Full Specification Document
Complete the form below to receive the full PDF specification document for use in architectural tenders and construction documentation.